n this post I will explain how to setup Visual Studio 2015 in order to develop an Angular 2 RC3 application hosted inside ASP.NET Core project. I of course read the quick start first. You need to make sure to install VS 2015, you can use Community edition of you want. You would also need to install ASP.NET Core.
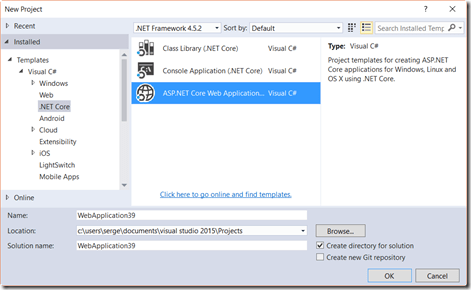
Let’s get started. Create new ASP.NET Core project.
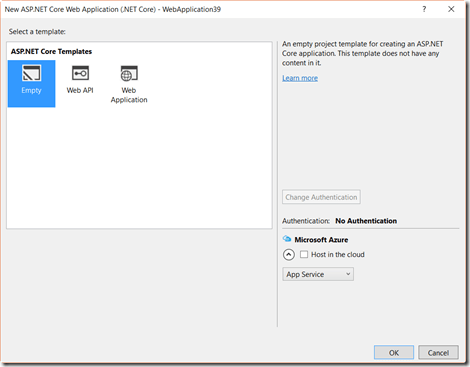
Select empty template to keep everything simple for getting started demo.
Let’s add static files support to serve a plain vanilla HTML page. Open project.json file and add the static files line from below.
{
  "dependencies": {
    "Microsoft.NETCore.App": {
      "version": "1.0.0",
      "type": "platform"
    },
    "Microsoft.AspNetCore.Diagnostics": "1.0.0",

    "Microsoft.AspNetCore.Server.IISIntegration": "1.0.0",
    "Microsoft.AspNetCore.Server.Kestrel": "1.0.0",
    "Microsoft.Extensions.Logging.Console": "1.0.0",
    "Microsoft.AspNetCore.StaticFiles": "1.0.0",
    "Microsoft.AspNetCore.Mvc": "1.0.0",
    "Microsoft.AspNetCore.Mvc.TagHelpers": "1.0.0",
    "Microsoft.AspNetCore.Razor.Tools": "1.0.0-preview2-final"
  },

  "tools": {
    "Microsoft.AspNetCore.Server.IISIntegration.Tools": "1.0.0-preview2-final",
    "Microsoft.DotNet.Watcher.Tools": "1.0.0-preview2-final"
  },

  "frameworks": {
    "netcoreapp1.0": {
      "imports": [
        "dotnet5.6",
        "portable-net45+win8"
      ]
    }
  },

  "buildOptions": {
    "emitEntryPoint": true,
    "preserveCompilationContext": true
  },

  "runtimeOptions": {
    "configProperties": {
      "System.GC.Server": true
    }
  },

  "publishOptions": {
    "include": [
      "wwwroot",
      "web.config"
    ]
  },

  "scripts": {
    "postpublish": [ "dotnet publish-iis --publish-folder %publish:OutputPath% --framework %publish:FullTargetFramework%" ]
  }
}
I also added support for DotNet.Watcher tools which make it easier to make changes to C# code and have the process automatically compile and restart as needed.
Now we can add a page which will host our Angular app. Again, add just a plain HTML page under wwwroot folder, since that is the root of our deployable Core application. You can just right click on that folder, add new item, then pick HTML page template. I am calling mine index.html. In order to see this page we need to turn off preloaded startup code and replace it with static files server. Open up Startup.cs file and replace Configure method with the following.
public class Startup
    {
        // This method gets called by the runtime. Use this method to add services to the container.
        // For more information on how to configure your application, visit http://go.microsoft.com/fwlink/?LinkID=398940
        public void ConfigureServices(IServiceCollection services)
        {
            services.AddMvc();
        }

        // This method gets called by the runtime. Use this method to configure the HTTP request pipeline.
        public void Configure(IApplicationBuilder app, IHostingEnvironment env, ILoggerFactory loggerFactory)
        {
            loggerFactory.AddConsole();

            if (env.IsDevelopment())
            {
                app.UseDeveloperExceptionPage();
            }


            app.UseStaticFiles();
            app.UseMvcWithDefaultRoute();
        }
    }
Now we can test the host page. Open up VS command prompt and navigate to the project folder (NOT solution folder). Type “dotnet watch run”. Your app will compile and Kestrel web server with start. Open browser and navigate to http://localhost:5000/index.html. You will see the host page. To make sure edit the index.html page and add some content to it. It is time to start up Angular 2 portion. I like adding NPM support to the project from command line. From the same command prompt type “npm init” to initialize NPM file. Follow the prompts, giving some meaningful answers. Once this is done, switch to visual studio. You will see that dependencies node in project explorer with have npm listed. Right click on that node and select open package.json. We need to add all Angular 2 scripts and dependencies by adding dependencies and devDependencies nodes as shown below.
{
  "name": "demo",
  "version": "1.0.0",
  "description": "",
  "main": "index.js",
  "scripts": {
    "test": "echo \"Error: no test specified\" && exit 1"
  },
  "author": "",
  "license": "ISC",
  "dependencies": {
    "@angular/common": "2.0.0",
    "@angular/compiler": "2.0.0",
    "@angular/core": "2.0.0",
    "@angular/forms": "2.0.0",
    "@angular/http": "2.0.0",
    "@angular/platform-browser": "2.0.0",
    "@angular/platform-browser-dynamic": "2.0.0",
    "@angular/router": "3.0.0",
    "systemjs": "0.19.27",
    "core-js": "^2.4.1",
    "reflect-metadata": "^0.1.3",
    "rxjs": "5.0.0-beta.12",
    "zone.js": "^0.6.23",
    "bootstrap": "^3.3.6"
  },
  "devDependencies": {
    "gulp": "^3.9.1",
    "typings": "^1.3.3",
    "del": "^2.2.2",
    "rimraf": "^2.5.4"
  }
}
All packages that start with @angular are angular core packages. This is different from beta versions, which only had a single package. Other packages are supporting packages for angular 2. In order to proving TypeScript support, we will use typings NPM module, which is under devDependencies. Give VS a minute to restore the packages after saving package.json file. If you get an error, just type “npm install” at the command prompt.
Now we need to install code JavaScript typings files for TypeScript. At the same prompt type “typings install –global –save dt~core-js”. Once completed, you will see typings folder in project explorer, with core-js folder under it.
In the next step we will setup compilation options for TypeScript. Add new item to the root of your project, selecting TypeScript Configuration File item template. Change the content to look as follows.
{
  "compileOnSave": true,
  "compilerOptions": {

    "target": "es5",
    "module": "commonjs",
    "moduleResolution": "node",
    "sourceMap": true,
    "emitDecoratorMetadata": true,
    "experimentalDecorators": true,
    "removeComments": false,
    "noImplicitAny": true,
    "suppressImplicitAnyIndexErrors": true
  },
  "exclude": [
    "node_modules",
    "wwwroot"
  ]
}
We are adding decorator options, which are required for Angular 2. We are setting module to use systemjs, which is the default for all the demos I have seen.
Now I am going to setup gulp to make my development flow a bit smoother. If you do not have gulp installed globally, type “npm install gulp” at the command prompt. After that you can add new item to the root of the project, selecting Gulp Configuration File item template. Open gulpfile.js and replace the content with the following.
var gulp = require('gulp');

gulp.task('thirdparty', function () {
    gulp.src('./node_modules/core-js/**/*.js')
        .pipe(gulp.dest('./wwwroot/node_modules/core-js'));
    gulp.src('./node_modules/@angular/**/*.js')
        .pipe(gulp.dest('./wwwroot/node_modules/@angular'));
    gulp.src('./node_modules/zone.js/**/*.js')
        .pipe(gulp.dest('./wwwroot/node_modules/zone.js'));
    gulp.src('./node_modules/systemjs/**/*.js')
        .pipe(gulp.dest('./wwwroot/node_modules/systemjs'));
    gulp.src('./node_modules/reflect-metadata/**/*.js')
        .pipe(gulp.dest('./wwwroot/node_modules/reflect-metadata'));
    gulp.src('./node_modules/rxjs/**/*.js')
        .pipe(gulp.dest('./wwwroot/node_modules/rxjs'));

});

gulp.task('copy', function () {
    gulp.src('./app/**/*.*')
        .pipe(gulp.dest('./wwwroot/app'));
});

gulp.task('watch', function () {
    gulp.watch('./app/**/*.*', ['copy']);
});

gulp.task('default', ['thirdparty', 'copy', 'watch']);
What is going on here? Third party task copies necessary Angular 2 scripts from node_modules folder to the same folder under wwwroot. Copy task copies our own application files, which will be placed under app folder under project root to wwwroot folder as well. Finally, watch task will monitor the changes to app folder and re-copy the files wwwroot folder by firing copy task. By default we will run all three tasks when we run gulp every time.
Time to write application code. Create new folder called “app” under project root. Now we need to create root component. We will add app.ts file with the following code.
import { Component } from "@angular/core";

@Component({
    selector: "app-shell",
    template: `
<h1>Demo with inline template built by {{name}}</h1>
<div>
<button (click)="say()">Click here</button>
</div>
`
})
export class App {
    name: string;
    constructor() {
        this.name = "Angular 2 developer!";
    }
    say(): void {
        alert(`Hello from ${this.name}`);
    }
}
We created a new class called App. It is decorated with a component attribute. We specify the selector or tag that will be replaced with our component. We also specify the HTML that will be injected and bound to the component. The component just has a property and a method to test data binding.
Now we need to create a starting module. Let’s call the file appModule.ts
import { NgModule }      from "@angular/core";
import { BrowserModule } from "@angular/platform-browser";
import { App }   from "./app";
@NgModule({
    imports: [BrowserModule],
    declarations: [App],
    bootstrap: [App]
})
export class AppModule { }
This class actually does not have any executable code, just a decorator that defines our root module. It imports compile module, BrowserModule, necessary for compiling and bootstrapping Angular code in browser. it contains our single App component that we both declare and bootsrtap, setting it as entry point into the application.
Finally, add new item to shell folder, picking TypeScript file template. Change the name to main. This will be our bootstrapping code for Angular 2 application.
import { platformBrowserDynamic } from "@angular/platform-browser-dynamic";
import { AppModule } from "./appModule";

platformBrowserDynamic().bootstrapModule(AppModule);
Now we need to configure systemjs module loader. Create new JavaScript file called system.config.js under wwwroot folder. This is the only file we will add there. We could also add it under app folder if we wanted to. Here it its content.
/**
 * System configuration for Angular 2 samples
 * Adjust as necessary for your application needs.
 */
(function (global) {
    // map tells the System loader where to look for things
    var map = {
        'app': 'app', // 'dist',
        '@angular': 'node_modules/@angular',
        'rxjs': 'node_modules/rxjs'
    };
    // packages tells the System loader how to load when no filename and/or no extension
    var packages = {
        'app': { main: 'main.js', defaultExtension: 'js' },
        'rxjs': { defaultExtension: 'js' }
    };
    var ngPackageNames = [
      'common',
      'compiler',
      'core',
      'forms',
      'http',
      'platform-browser',
      'platform-browser-dynamic',
      'router'
    ];
    // Individual files (~300 requests):
    function packIndex(pkgName) {
        packages['@angular/' + pkgName] = { main: 'index.js', defaultExtension: 'js' };
    }
    // Bundled (~40 requests):
    function packUmd(pkgName) {
        packages['@angular/' + pkgName] = { main: '/bundles/' + pkgName + '.umd.js', defaultExtension: 'js' };
    }
    // Most environments should use UMD; some (Karma) need the individual index files
    var setPackageConfig = System.packageWithIndex ? packIndex : packUmd;
    // Add package entries for angular packages
    ngPackageNames.forEach(setPackageConfig);
    var config = {
        map: map,
        packages: packages
    };
    System.config(config);
})(this);
We are specifying our app folder as a package for system js. We are also adding core angular packages, including rxjs, reactive extensions. We are configuring systemjs by calling config method and passing our packages map. Finally we are starting app package. Previously in the same file we specified that the entry point for it is main.js.
It is time to edit our index.chtml page and add the necessary scripts. We will start by creating views folder with some stock files. I am adding _ViewStart.cshtml under Views.
@{
    Layout = "_Layout";
}
This code just sets up default layout page for all our views. Now we just need default view. I am going to create home folder and single view under it Index.cshtml. Its content is very simple.
<app-shell>Loading...</app-shell>
It just contains the tag for our root component. Now the import part of adding out layout page, _Layout.cshtml under Views/Shared folder. It just contains all the necessary libraries.
<!DOCTYPE html>

<html>
<head>
    <meta name="viewport" content="width=device-width" />
    <title>@ViewBag.Title</title>
</head>
<body>
    <div>
        @RenderBody()
    </div>

    <script>
        (function (myAngularApp) {
            (function (config) {
                config.rootUrl = '@Url.Content("~/")';

                console.log("added configuration.  Config data is " + JSON.stringify(window.myAngularApp.config));
            })(window.myAngularApp.config || (window.myAngularApp.config = {}))

        })(window.myAngularApp || (window.myAngularApp = {}))
    </script>

    <script src="~/node_modules/core-js/client/shim.min.js"></script>

    <script src="~/node_modules/zone.js/dist/zone.js"></script>
    <script src="~/node_modules/reflect-metadata/Reflect.js"></script>
    <script src="~/node_modules/systemjs/dist/system.src.js"></script>
    <script src="~/system.config.js"></script>
    <script>
        System.import('app')
            .then(
        function () { console.log('started application'); },
        function (err) { console.log('error starting application'); console.log(err); });
    </script>
</body>
</html>
It also setups up configuration object, which we do not technically need in this sample app, but it is a good illustration on how to inject server side configuration into client side JavaScript. We are keeping node_modules and third party libraries folder, but to be sure, we are not using entire folder, we just compy necessary stuff via gulp (see above).
Time to create C# controller under Controllers folder. We will call it HomeController.
using Microsoft.AspNetCore.Mvc;

// For more information on enabling MVC for empty projects, visit http://go.microsoft.com/fwlink/?LinkID=397860

namespace WebAppAngular2RTM.Controllers
{
    public class HomeController : Controller
    {
        // GET: /<controller>/
        public IActionResult Index()
        {
            return View();
        }
    }
}
You can now build the project in the Visual Studio just in case. Then switch to command prompt, navigate to the folder where our project is (NOT solution). Just make sure you see project.json file. Now we need to run gulp to copy files around. Type “gulp” and let the process finish. Now open second prompt, nvaigate to the same folder and type “dotnet watch run”. This will compile if necessary, start runtime process and watch for any changes. Let this finish as well. Make sure you see something like the following: .
Now listening on: http://localhost:5000
Application started. Press Ctrl+C to shut down.
Final step. Open browser and navigate to the URL above. You should see the following.

Feel free to click on a button to make sure the method in your App component got bound properly as well. Also feel free to make changes to the App component and refresh the page to see them.
In this post we achieved a lot. We setup new .Net Core project, created default controller and cshtml page, setup Angular 2 minimal application, setup watcher for .NET and TypeScript code to make changes without manual compilation and ran our project. Quite a bit of work.
Enjoy. You can download this demo here. You will need to run npm install to download necessary packages or let Visual Studio do this automatically..
Great tutorial, just two tiny errors:
typings install –global –save dt~core-j
should be
typings install –global –save dt~core-js
should be
according to the file you make us create.
[script src=”~/system.config.js”][/script]
should be
[script src=”~/startup.js”][/script]
Typings code is correct, but I will fix the code according to your second comment. Thanks, Vincent.
For typings, I meant you need two dashes for the parameters – -, it is shown as a single dash line in the page.
Thanks for the tutorial!
One beginner question – Is there any special benefit we enable MVC in this project? Couldn’t we just put all scripts into a plain old index.html and let the anuglar do all the work?
I regard it as a more “pure” solution if we do not mix the asp.net core and the angular.
Is it possible to use VS native build process without Gulp since gulp is only used to copy the js files to wwwroot folder?
@Victor. Sure, but you have to build all the time.
Hello. Thank you for this. It is great
I have really only one problem – can not deploy this sample on IIS… getting HTTP error 500.. any ideea?
thank you in advance
adrian
Start by looking at response in browser to see if there are hints. Make sure you have web.config is correct. Make sure you use publish process in studio.
You have to use publish feature to package the app